「Spring Bootで簡単なWebアプリケーションを書いてみる」では、Spring Bootで簡単なWebアプリケーションを書いた。 ここでは作成したアプリケーションをベースに、Spring Securityを使ってユーザ認証を実装してみる。
環境
Windows 10 Pro、Java SE 8、Spring Framework 4.3.7.RELEASE(Spring Boot 1.5.2.RELEASE)
>systeminfo
OS 名:                  Microsoft Windows 10 Pro
OS バージョン:          10.0.14393 N/A ビルド 14393
OS ビルドの種類:        Multiprocessor Free
システムの種類:         x64-based PC
プロセッサ:             1 プロセッサインストール済みです。
                        [01]: Intel64 Family 6 Model 69 Stepping 1 GenuineIntel ~1596 Mhz

>java -version
java version "1.8.0_121"
Java(TM) SE Runtime Environment (build 1.8.0_121-b13)
Java HotSpot(TM) 64-Bit Server VM (build 25.121-b13, mixed mode)
Spring Securityを依存ライブラリに追加する
Spring Securityは、認証・認可を中心に、各種HTTPセキュリティヘッダやCSRF対策を含めたセキュリティ機能を提供するライブラリである。
Hello Spring Security with Bootを参考に、以下の三つのライブラリをプロジェクトの依存ライブラリに追加する。
- spring-security-web
- groupId: org.springframework.security
- artifactId: spring-security-web
- version: 4.2.2.RELEASE
- spring-security-config
- groupId: org.springframework.security
- artifactId: spring-security-config
- version: 4.2.2.RELEASE
- thymeleaf-extras-springsecurity4
- groupId: org.thymeleaf.extras
- artifactId: thymeleaf-extras-springsecurity4
- version: 2.1.2.RELEASE
依存ライブラリの追加は次のように行う。
- 「demo [boot]」を右クリックして、「Maven」→「Add Dependency」を選択
- ダイアログの各フィールドを入力してOK
Spring Securityを有効にする
まず、Spring Securityの設定を行うWebSecurityConfigクラスを作成する。 ここでは、パッケージ名をcom.example.configに分けることにする。
package com.example.config;

import org.springframework.beans.factory.annotation.Autowired;
import org.springframework.security.config.annotation.authentication.builders.AuthenticationManagerBuilder;
import org.springframework.security.config.annotation.web.builders.HttpSecurity;
import org.springframework.security.config.annotation.web.configuration.EnableWebSecurity;
import org.springframework.security.config.annotation.web.configuration.WebSecurityConfigurerAdapter;

@EnableWebSecurity
public class WebSecurityConfig extends WebSecurityConfigurerAdapter {

    @Override
    protected void configure(HttpSecurity http) throws Exception {
        http
            .authorizeRequests()
                .antMatchers("/", "/login", "/login-error").permitAll()
                .antMatchers("/**").hasRole("USER")
                .and()
            .formLogin()
                .loginPage("/login").failureUrl("/login-error");
    }

    @Autowired
    public void configureGlobal(AuthenticationManagerBuilder auth) throws Exception {
        auth
            .inMemoryAuthentication()
                .withUser("user").password("password").roles("USER");
    }

}
次に、認証関係のエンドポイントを実装するControllerを作る。
ついでに、/にアクセスした際は認証後の適当なページにリダクレクトするようにする。
package com.example;

import org.springframework.stereotype.Controller;
import org.springframework.ui.Model;
import org.springframework.web.bind.annotation.GetMapping;
import org.springframework.web.bind.annotation.PostMapping;
import org.springframework.web.bind.annotation.RequestMapping;

@Controller
public class AuthController {

    @RequestMapping("/")
    public String index() {
        return "redirect:/messages";
    }

    @GetMapping("/login")
    public String login() {
        return "login";
    }

    @PostMapping("/login")
    public String loginPost() {
        return "redirect:/login-error";
    }

    @GetMapping("/login-error")
    public String loginError(Model model) {
        model.addAttribute("loginError", true);
        return "login";
    }

}
続けて、ログインページのテンプレートファイルを作る。
- src/main/resources/templates/login.html
<!DOCTYPE html>
<html xmlns:th="http://www.thymeleaf.org">
<head>
<meta charset="utf-8" />
<title>Login page</title>
</head>
<body>
<h1>Login page</h1>

<p>Example user: user / password</p>

<form th:action="@{/login}" method="post">
    <p th:if="${loginError}"><em>Username or password is wrong.</em></p>
    <p><label for="username">Username</label>:
       <input type="text" id="username" name="username" autofocus="autofocus" /></p>
    <p><label for="password">Password</label>:
       <input type="password" id="password" name="password" /></p>
    <p><input type="submit" value="Log in" /></p>
</form>

<p><a th:href="@{/signup}">Sign up</a></p>

<p><a th:href="@{/}">Back to index</a></p>
</body>
</html>
ここでは、あとで実装する新規登録ページへのリンクも記述している。
最後に、ログイン後のページで認証情報を表示するように変更する。
- src/main/resources/templates/messages.html
<!DOCTYPE html>
<html xmlns:th="http://www.thymeleaf.org"
      xmlns:sec="http://www.thymeleaf.org/thymeleaf-extras-springsecurity4">
<head>
<meta charset="UTF-8" />
<title>Hello, Spring Boot!</title>
</head>
<body>
<h1>Hello, Spring Boot!</h1>

<div th:fragment="logout" sec:authorize="isAuthenticated()">
    <p>Login as: <span sec:authentication="name"></span> <span sec:authentication="principal.authorities"></span></p>
    <form action="#" th:action="@{/logout}" method="post">
        <input type="submit" value="Logout" />
    </form>
</div>

(snip)
ユーザ認証が有効になっていることを確認してみる
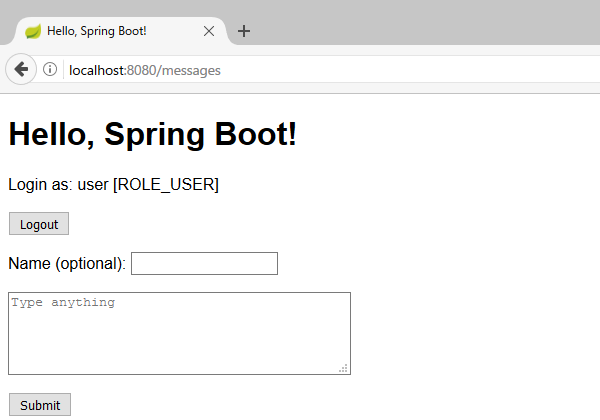
アプリケーションを起動し、ブラウザで http://localhost:8080/messages にアクセスすると作成したログインページにリダイレクトされる。 ここで、ハードコードした認証情報を入力してログインした後のスクリーンショットを次に示す。

ログインユーザのユーザ名とロールが表示されていることが確認できる。
curlコマンドを使ってアクセスしてみると次のようになる。
$ curl -vL http://localhost:8080/messages
(snip)
> GET /messages HTTP/1.1
> Host: localhost:8080
> User-Agent: curl/7.52.1
> Accept: */*
>
(snip)
< HTTP/1.1 302
< X-Content-Type-Options: nosniff
< X-XSS-Protection: 1; mode=block
< Cache-Control: no-cache, no-store, max-age=0, must-revalidate
< Pragma: no-cache
< Expires: 0
< X-Frame-Options: DENY
< Set-Cookie: JSESSIONID=EF42809C6B5C0F4776B475AE64DFB530;path=/;HttpOnly
< Location: http://localhost:8080/login
< Content-Length: 0
< Date: Wed, 12 Apr 2017 05:02:50 GMT
<
(snip)
> GET /login HTTP/1.1
> Host: localhost:8080
> User-Agent: curl/7.52.1
> Accept: */*
>
(snip)
< HTTP/1.1 200
< X-Content-Type-Options: nosniff
< X-XSS-Protection: 1; mode=block
< Cache-Control: no-cache, no-store, max-age=0, must-revalidate
< Pragma: no-cache
< Expires: 0
< X-Frame-Options: DENY
< Set-Cookie: JSESSIONID=5199D5F5515BA8D428C2E2376ACEF95B;path=/;HttpOnly
< Content-Type: text/html;charset=UTF-8
< Content-Language: ja-JP
< Transfer-Encoding: chunked
< Date: Wed, 12 Apr 2017 05:02:50 GMT
<
<!DOCTYPE html>

<html>
<head>
<meta charset="utf-8" />
<title>Login page</title>
</head>
<body>
<h1>Login page</h1>

<p>Example user: user / password</p>

<form method="post" action="/login">

    <p><label for="username">Username</label>:
       <input type="text" id="username" name="username" autofocus="autofocus" /></p>
    <p><label for="password">Password</label>:
       <input type="password" id="password" name="password" /></p>
    <p><input type="submit" value="Log in" />
       <a href="/recovery/">Forgot password?</a></p>
<input type="hidden" name="_csrf" value="8d46d6f8-8ae5-4d89-805e-7cbb1cac8185" /></form>

<p><a href="/signup">Sign up</a></p>

<p><a href="/">Back to index</a></p>
</body>
</html>
(snip)
レスポンスから、以下のセキュリティ機能が有効になっていることがわかる。
X-Content-Type-Options: nosniffX-XSS-Protection: 1; mode=blockCache-Control: no-cache, no-store, max-age=0, must-revalidate、Pragma: no-cache、Expires: 0- クライアントがキャッシュしないようにする。認証後のコンテンツがクライアント側にキャッシュとして残ることを防ぐ。
X-Frame-Options: DENY- iframe内では表示されないようにする。クリックジャッキングを防ぐ。
Set-Cookie: JSESSIONID=7BFDAA8C20E3C9FCDC7569B879DBB406;path=/;HttpOnly- CookieをJavaScriptから取得できないようにする。XSSによるセッションハイジャックを防ぐ。
<input type="hidden" name="_csrf" value="7e18728d-d26f-462f-9410-6c1b0d2671a9" />
この他にも、Session Fixationを防ぐためのセッションID更新や、HTTPSの場合にはHTTP Strict Transport Security(HSTS)ヘッダの付与が行われる。 個々の詳細については、リファレンスを参照。
DBにユーザ管理テーブルを作る
ハードコードした認証情報でログインできることが確認できたので、DBにユーザ管理テーブルを作り、アカウント作成ができるようにしてみる。 ここでは、Userロールに加えてAdminロールも作り、管理者権限を持ったユーザを作れるようにする。
まず、WebSecurityConfigクラスを変更し、ユーザ認証にUserServiceクラスを使うようにする。 また、パスワードはBCryptでハッシュ化して扱うようにする。
package com.example.config;

import org.springframework.beans.factory.annotation.Autowired;
import org.springframework.context.annotation.Bean;
import org.springframework.security.config.annotation.authentication.builders.AuthenticationManagerBuilder;
import org.springframework.security.config.annotation.web.builders.HttpSecurity;
import org.springframework.security.config.annotation.web.configuration.EnableWebSecurity;
import org.springframework.security.config.annotation.web.configuration.WebSecurityConfigurerAdapter;
import org.springframework.security.crypto.bcrypt.BCryptPasswordEncoder;
import org.springframework.security.crypto.password.PasswordEncoder;

import com.example.User;
import com.example.UserService;

@EnableWebSecurity
public class WebSecurityConfig extends WebSecurityConfigurerAdapter {

    @Autowired
    private UserService userService;

    @Override
    protected void configure(HttpSecurity http) throws Exception {
        http
            .authorizeRequests()
                .antMatchers("/", "/login", "/login-error").permitAll()
                .antMatchers("/**").hasRole("USER")
                .and()
            .formLogin()
                .loginPage("/login").failureUrl("/login-error");
    }

    @Override
    protected void configure(AuthenticationManagerBuilder auth) throws Exception {
        auth
            .userDetailsService(userService)
            .passwordEncoder(passwordEncoder());

        userService.registerAdmin("admin", "youmustchangethis", "admin@localhost");
    }

    @Bean
    public PasswordEncoder passwordEncoder() {
        return new BCryptPasswordEncoder();
    }

}
passwordEncoderメソッドには@Beanアノテーションをつけ、他のクラスでDependency Injectionできるようにしておく。
次に、UserDetailsインタフェースを実装したEntityクラスを作る。
package com.example;

import java.util.ArrayList;
import java.util.Collection;
import java.util.Date;
import java.util.EnumSet;
import java.util.List;
import java.util.Set;

import javax.persistence.Column;
import javax.persistence.ElementCollection;
import javax.persistence.Entity;
import javax.persistence.EnumType;
import javax.persistence.Enumerated;
import javax.persistence.FetchType;
import javax.persistence.GeneratedValue;
import javax.persistence.GenerationType;
import javax.persistence.Id;
import javax.persistence.PrePersist;
import javax.persistence.Temporal;
import javax.persistence.TemporalType;

import org.springframework.security.core.GrantedAuthority;
import org.springframework.security.core.authority.SimpleGrantedAuthority;
import org.springframework.security.core.userdetails.UserDetails;

@Entity
public class User implements UserDetails {

    private static final long serialVersionUID = 1L;

    public enum Authority {ROLE_USER, ROLE_ADMIN}

    @Id
    @GeneratedValue(strategy = GenerationType.AUTO)
    private Long id;

    @Column(nullable = false, unique = true)
    private String username;

    @Column(nullable = false)
    private String password;

    @Column(nullable = false, unique = true)
    private String mailAddress;

    @Column(nullable = false)
    private boolean mailAddressVerified;

    @Column(nullable = false)
    private boolean enabled;

    @Temporal(TemporalType.TIMESTAMP)
    private Date createdAt;

    @ElementCollection(fetch = FetchType.EAGER)
    @Enumerated(EnumType.STRING)
    @Column(nullable = false)
    private Set<Authority> authorities;

    // JPA requirement
    protected User() {}

    public User(String username, String password, String mailAddress) {
        this.username = username;
        this.password = password;
        this.mailAddress = mailAddress;
        this.mailAddressVerified = false;
        this.enabled = true;
        this.authorities = EnumSet.of(Authority.ROLE_USER);
    }

    @PrePersist
    public void prePersist() {
        this.createdAt = new Date();
    }

    public boolean isAdmin() {
        return this.authorities.contains(Authority.ROLE_ADMIN);
    }

    public void setAdmin(boolean isAdmin) {
        if (isAdmin) {
            this.authorities.add(Authority.ROLE_ADMIN);
        } else {
            this.authorities.remove(Authority.ROLE_ADMIN);
        }
    }

    @Override
    public Collection<? extends GrantedAuthority> getAuthorities() {
        List<GrantedAuthority> authorities = new ArrayList<>();
        for (Authority authority : this.authorities) {
            authorities.add(new SimpleGrantedAuthority(authority.toString()));
        }
        return authorities;
    }

    @Override
    public boolean isAccountNonExpired() {
        return true;
    }

    @Override
    public boolean isAccountNonLocked() {
        return true;
    }

    @Override
    public boolean isCredentialsNonExpired() {
        return true;
    }

    @Override
    public String getUsername() {
        return username;
    }

    public void setUsername(String username) {
        this.username = username;
    }

    @Override
    public String getPassword() {
        return password;
    }

    public void setPassword(String password) {
        this.password = password;
    }

    @Override
    public boolean isEnabled() {
        return this.enabled;
    }

    public void setEnabled(boolean enabled) {
        this.enabled = enabled;
    }

    public Long getId() {
        return id;
    }

    public String getMailAddress() {
        return mailAddress;
    }

    public void setMailAddress(String mailAddress) {
        this.mailAddress = mailAddress;
    }

    public boolean isMailAddressVerified() {
        return mailAddressVerified;
    }

    public void setMailAddressVerified(boolean mailAddressVerified) {
        this.mailAddressVerified = mailAddressVerified;
    }

    public Date getCreatedAt() {
        return createdAt;
    }

}
ここでは、UserDetailsインタフェースで定義されているisAccountNonExpired()、isAccountNonLocked()、isCredentialsNonExpired()は使用せず、常にtrueを返すようにしている。
また、isAdmin/setAdminメソッドを実装し、管理者権限の確認と変更を行えるようにしている。
ロールを表すAuthorityはenumで定義し、authoritiesメンバをAuthorityのSetとして定義する。
このようなCollectionを持つメンバについては、@ElementCollection(fetch = FetchType.EAGER)をつけることでDB上のマッピングを行うことができる。
enumの場合はさらに@Enumerated(EnumType.STRING)をつけ、Setインタフェースの実装としてEnumSetクラスを利用する。
続けて、DB操作に対応するRepositoryインタフェースを定義する。
package com.example;

import org.springframework.data.repository.CrudRepository;
import org.springframework.stereotype.Repository;

@Repository
public interface UserRepository extends CrudRepository<User, Long> {

    public User findByUsername(String username);

    public User findByMailAddress(String mailAddress);

}
最後に、UserDetailsServiceインタフェースを実装したServiceクラスを作る。
package com.example;

import org.springframework.beans.factory.annotation.Autowired;
import org.springframework.security.core.userdetails.UserDetailsService;
import org.springframework.security.core.userdetails.UsernameNotFoundException;
import org.springframework.security.crypto.password.PasswordEncoder;
import org.springframework.stereotype.Service;
import org.springframework.transaction.annotation.Transactional;

@Service
public class UserService implements UserDetailsService {

    @Autowired
    private UserRepository repository;

    @Autowired
    private PasswordEncoder passwordEncoder;

    @Override
    public User loadUserByUsername(String username) throws UsernameNotFoundException {
        if (username == null || "".equals(username)) {
            throw new UsernameNotFoundException("Username is empty");
        }

        User user = repository.findByUsername(username);
        if (user == null) {
            throw new UsernameNotFoundException("User not found: " + username);
        }

        return user;
    }

    @Transactional
    public void registerAdmin(String username, String password, String mailAddress) {
        User user = new User(username, passwordEncoder.encode(password), mailAddress);
        user.setAdmin(true);
        repository.save(user);
    }

    @Transactional
    public void registerUser(String username, String password, String mailAddress) {
        User user = new User(username, passwordEncoder.encode(password), mailAddress);
        repository.save(user);
    }

}
loadUserByUsernameメソッドは、ユーザ名を引数に取り対応するUserDetailsかUsernameNotFoundException例外を返す。 ここでは、ユーザ名が空かどうかをチェックした後、そのユーザ名でDBを検索している。
また、registerAdmin/registerUserメソッドでは、DBに保存する前にパスワードをBCryptでハッシュ化する。
passwordEncoderメンバは、@AutoWiredによるDependency Injectionにより、実行時にWebSecurityConfigクラスのメソッドが呼ばれて代入される。
ユーザ登録ページを作る
まず、WebSecurityConfigクラスのpermitAll()に/signupを追加し、非ロクインユーザがアクセスできるようにする。
package com.example.config;

(snip)

@EnableWebSecurity
public class WebSecurityConfig extends WebSecurityConfigurerAdapter {

    (snip)

    @Override
    protected void configure(HttpSecurity http) throws Exception {
        http
            .authorizeRequests()
                .antMatchers("/", "/signup", "/login", "/login-error").permitAll()
                .antMatchers("/**").hasRole("USER")
                .and()
            .formLogin()
                .loginPage("/login").failureUrl("/login-error");
    }

    (snip)

}
次に、Controllerにユーザ登録ページのエンドポイントを作る。
package com.example;

import javax.servlet.ServletException;
import javax.servlet.http.HttpServletRequest;
import javax.validation.Valid;

import org.springframework.beans.factory.annotation.Autowired;
import org.springframework.dao.DataIntegrityViolationException;
import org.springframework.stereotype.Controller;
import org.springframework.ui.Model;
import org.springframework.validation.BindingResult;
import org.springframework.web.bind.annotation.GetMapping;
import org.springframework.web.bind.annotation.PostMapping;
import org.springframework.web.bind.annotation.RequestMapping;

@Controller
public class AuthController {

    @Autowired
    UserService userService;

    (snip)

    @GetMapping("/signup")
    public String signup(Model model) {
        model.addAttribute("signupForm", new SignupForm());
        return "signup";
    }

    @PostMapping("/signup")
    public String signupPost(Model model, @Valid SignupForm signupForm, BindingResult bindingResult, HttpServletRequest request) {
        if (bindingResult.hasErrors()) {
            return "signup";
        }

        try {
            userService.registerUser(signupForm.getUsername(), signupForm.getPassword(), signupForm.getMailAddress());
        } catch (DataIntegrityViolationException e) {
            model.addAttribute("signupError", true);
            return "signup";
        }

        try {
            request.login(signupForm.getUsername(), signupForm.getPassword());
        } catch (ServletException e) {
            e.printStackTrace();
        }

        return "redirect:/messages";
    }

}
package com.example;

import javax.validation.constraints.Pattern;
import javax.validation.constraints.Size;

import org.hibernate.validator.constraints.Email;

public class SignupForm {

    @Pattern(regexp="^\\w{3,32}$", message="size must be between 3 and 32, each character must be alphanumeric or underscore (A-Za-z0-9_)")
    private String username;

    @Size(min=8, max=255)
    private String password;

    @Email
    @Size(min=3, max=255)
    private String mailAddress;

    public String getUsername() {
        return username;
    }

    public void setUsername(String username) {
        this.username = username;
    }

    public String getPassword() {
        return password;
    }

    public void setPassword(String password) {
        this.password = password;
    }

    public String getMailAddress() {
        return mailAddress;
    }

    public void setMailAddress(String mailAddress) {
        this.mailAddress = mailAddress;
    }

}
フォームを送信すると、新しいユーザをDBに登録した後、ログインを行い適当なページにリダイレクトする。 このとき、DBのUNIQUE制約違反(DataIntegrityViolationException例外)が発生する場合があることに注意する。
ここでは、ユーザ名のバリデーションに@Patternを用い、正規表現で文字種を制限している。
@Patternのデフォルトのエラーメッセージはユーザに不親切なため、messageパラメータで適切なエラーメッセージを指定しておくとよい。
また、メールアドレスのバリデーションにはHibernate Validatorの@Emailが使える。
最後に、ユーザ登録ページのテンプレートファイルを作成する。
- src/main/resources/templates/signup.html
<!DOCTYPE html>
<html xmlns:th="http://www.thymeleaf.org">
<head>
<meta charset="utf-8" />
<title>Sign up page</title>
</head>
<body>
<h1>Sign up page</h1>

<form action="#" th:action="@{/signup}" th:object="${signupForm}" method="post">
    <p th:if="${signupError}"><em>Username or mail address is already used.</em></p>

    <p><label for="username">Username</label>:
       <input type="text" id="username" name="username" autofocus="autofocus" />
       <em th:if="${#fields.hasErrors('username')}" th:errors="*{username}">Username Error</em></p>
    <p><label for="password">Password</label>:
       <input type="password" id="password" name="password" />
       <em th:if="${#fields.hasErrors('password')}" th:errors="*{password}">Password Error</em></p>
    <p><label for="mailAddress">Mail address</label>:
       <input type="email" id="mailAddress" name="mailAddress" />
       <em th:if="${#fields.hasErrors('mailAddress')}" th:errors="*{mailAddress}">Mail Address Error</em></p>
    <p><input type="submit" value="Sign up" /></p>
</form>

<p><a th:href="@{/login}">Login</a></p>

<p><a th:href="@{/}">Back to index</a></p>
</body>
</html>
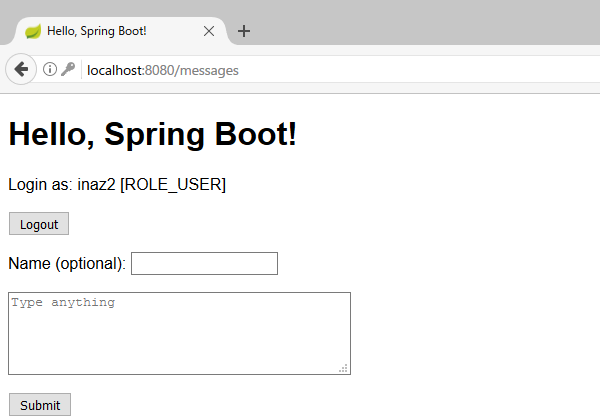
/signupにアクセスしてユーザ登録すると、作成したユーザでログインできていることが確認できる。

また、既存のユーザ名で新規登録しようとすると正しくエラーが表示されること、ハードコードした管理者アカウントでログインするとロールにROLE_ADMINがついていることが確認できる。
DB認証以外の認証方式
Spring Securityは、ここで利用したインメモリ認証、DB認証の他に、LDAP、CAS、JAAS(Java Authentication and Authorization Service)による認証方式をサポートしている。 また、別プロジェクトとしてOAuth、SAML、Kerberosを利用するライブラリも開発されている。
注意事項
この記事はライブラリの使い方の説明を主目的としているため、認証機能の実装は簡略化されている。 現実には、メール送信によるメールアドレスの到達性確認、連続ログイン失敗時におけるアカウントロックやディレイ、パスワードリセットやその承認など、要件に応じてさまざまな実装が必要となる。
また、Spring Securityはセキュリティ機能の実装を支援するライブラリであるが、これを利用したアプリケーションそのものがセキュアであるかは別の問題である。 権限によるアクセス制御に不備があれば、直接アクセスすることで権限を持たないユーザが権限を要する情報を閲覧したり、操作を実行できたりしてしまう。 あるいは、セッションを用いた画面遷移のチェックに不備があれば、直接アクセスすることで途中の入力とそのチェックが飛ばされてしまう。 テンプレートエンジンの不適切な使用によるXSS、JavaScript中の不適切な実装によるDOM-based XSSもある。 したがってライブラリの有無によらず、設計・実装を適宜確認することと、異常系や考えうる攻撃に対して安全であるかのテストが必要である。
StrutsにおけるOGNLのように、SpringにもSpring Expression Language(SpEL)と呼ばれる式言語がある。
SpELはクラスの参照やプロパティへのアクセス、メソッド呼び出しが可能であり、外部からの入力を含む式を実行するとEL Injection攻撃が成立してしまう。
SpEL式が実行される箇所としてはコード中のSpelExpressionParser#parseExpression()の他に、JSPの<spring:message code="" />や<spring:eval expression="" />が知られている。
Spring Framework本体や依存ライブラリ、JREの脆弱性についても注意が必要である。 Springを含むPivotal製ソフトウェアの脆弱性情報は次のページで公開されており、ここ一年においてもSpring関係の脆弱性がいくつか報告されている。
多くの場合ライブラリのパッチアップデートが根本的な対策となるため、インターネットに公開するなどリスクが高い場合はパッチアップデートを適用できる状態にしておくのが望ましい。
関連リンク
- Spring BootとSpring Securityでユーザ認証(インメモリ&独自のユーザテーブル) - くらげになりたい。
- java - Spring authentication with bcrypt - Stack Overflow
- Effective Java Item 32: Use EnumSet instead of bit fields – Dhruba Bandopadhyay
- java - How to persist an EnumSet (using two database tables)? - Stack Overflow
- hibernate - Difference between @OneToMany and @ElementCollection? - Stack Overflow
- Spring+Hibernate連携時の主なExceptionまとめ - yomamaのdev日記 (from jemomo)
- Hibernate 3の例外とSpringの例外の対応関係 - ただのSEの雑記帳
- 勉強メモ/Spring Framework関連での脆弱性報告の傾向 - Qiita